Skip to Content


FREE SHIPPING
*On Orders Over $250We Call Within 48 Business Hours to Confirm Order
FREE SHIPPING
*On Orders Over $250We Call Within 48 Business Hours to Confirm Order
We sell Floor safes because they have one major security advantage: they are completely hidden. In fact, on many ocations we've had customers call us after living in a home for several years asking us to open a floor safe they've just discovered! For safes going on a ground floor of a building, there is no more secure safe than a hidden floor safe.
Summary

Nowadays, the best time to install a floor safe is when your home is being built. You pick a spot and prep for the installation before the concrete is ever poured. This is because modern home foundations have post tension cables.
Post tension cables are steel cables that run in a checker-board pattern throughout your homes foundation. They are inserted into the foundation when the slab is being poured and are then tensioned to about 30,000 lbs of force before the slab is fully dried. This helps prevent the foundation from later cracking and separating. The process became standard in the mid 1990s. For more information see our Article How to Tell if You Have Post Tension Slab.
 Cutting a post tension cable can cause severe damage to your home. The only way to perform an installation of a floor safe into a post tension slab is 1) Install the safe before the foundation is poured, during construction or 2) have an engineer determined perform a site evaluation to show you where/if it is safe to install a safe.
If your home is not post-tension, follow the steps below for a floor safe installation.
Before getting started with the safe installation, it's crucial to evaluation the home's slab where you plan to install the safe. You don't want to find out too late that there are plumbing lines or electrical wires hidden beneath the surface.
Additionally, since the safe is lower than ground level, avoid areas prone to flooding or water seepage.
Consult with an engineer to ensure there are no pipes, wires, or other obstacles beneath the concrete floor where you are installing the safe. There concrete scanners available for this purpose, but to be sure, an engineer is recommended.
Consider installing the safe in discreet locations such as under the stairs, your bed, or in a closet. Placing a rug or piece of furniture on top of the safe can further conceal its presence.
Don't forget to factor in the thickness of your flooring to ensure the in-floor safe is even with the floor level after it is installed. When determining the depth of the safe, you want the lid of the floor safe to be flush with the slab of the home. The flooring material (carpet, tile, wood, etc...) is placed on top of the lid, so that everything then blends in and will be flush.

Preparing for the safe will require you knock out some of the slab. A jackhammer, a shovel, a tamper, a concrete float, tarps or drop cloths, and chisel should be at hand. Get enough 1/4 minus dirt from an outdoor company to create at least a 2" solid flat base for the safe. and enough concrete to fill a 2" air gap around the safe.
Cut a square sheet of plywood to the depth (plus two inches) and width of the safe.
When choosing your floor safe consider the following:
Remove any flooring present in the area.
Before cutting through the concrete slab, mark the concrete with the dimensions for the floor safe PLUS 4 inches to the length and width. This will allow a 2" concrete perimeter around the entire safe body.
Cutting through the concrete slab is done using an electric jack hammer. They can be rented from most home stores. Using your marked line as a guide, start hammering out the concrete. You can always use a chisel to fine tune it, but it's not usually necessary so long as the hole is large enough to encompass the safe, plus the 4 inches, you've marked for.
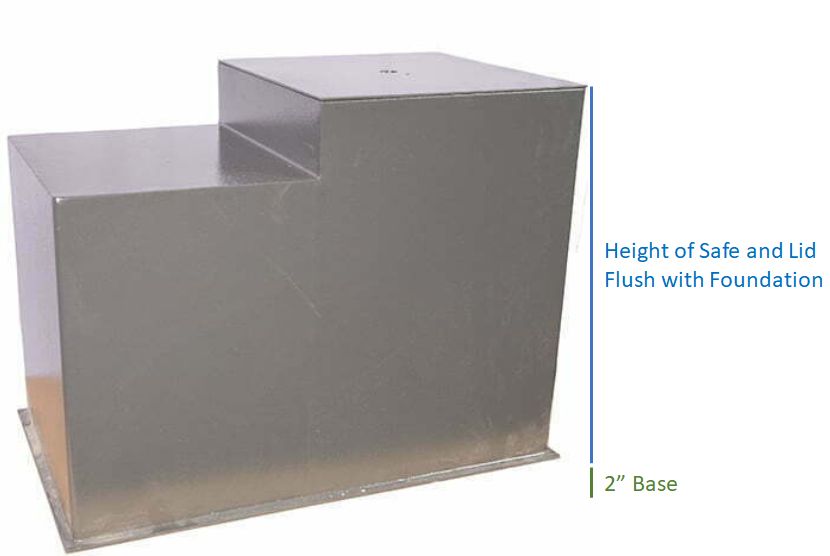
Once the concrete is removed, dig down to the depth of the safe slide, PLUS at least two inches. You measure the depth of the safe from the base to the top of the cover plate (i.e. lid) when it is placed on the safe.
Pro Tip: Instead of putting the safe in and taking it out several times or relying only on a measuring tap to check the depth in one single spot, use a square cut flat piece of plywood. You can slide this along the length hole to make sure you are deep enough within the entire hole.
Place a 2" layer of 1/4 minus landscaping dirt into the bottom of the hole and tamp it firm using the tamper. this will create a level solid resting spot for the safe.
Set the safe into the hole.
If the hole was dug correctly, the top of the floor safe's lid will now be flush with the top of the concrete.
Place the lid on the safe and use painters tape around the lid and over the center hole of the lid to prevent concrete from entering the safe.
Mix up the concrete.
To complete the floor safe installation, you'll need to fill the gaps with concrete using a concrete mix, a trowel, and a bucket of water.
If you're floor safe has a 90 degree bend in it, you'll need enough concrete to not only fill around the safe, but to fill on top of this bend (usually 3-4").
When mixing the concrete the desired consistency is slightly wetter than usual. A bit more wet than peanut butter. Not too much, but enough so that you can use a stick or other tool to easily remove any air gaps in the concrete surrounding the safe.
Using a bucket filled with concrete, pour the concrete space around the safe. Use a stick or other item to manipulate the concrete to completely fill the air gaps.
When full, use a concrete float to level the concrete and ensure it is flush with the foundation.
Allow the concrete to dry for at least 48 hours.
Replace your flooring. It is best to place some flooring onto the lid of the safe so that it blends in naturally with the floor.
From start to finish a floor safe installation will take from 3-5 hours depending on the size of the safe being installed.
A floor safe is 100% fire protected and an excellent security safe due to it's camelflouge.
But being below the floor means that the safe dial will come in contact with more moisture and dirt than a safe that sits upon the floor.
Because of this, it is important to have the safe dial and mechanical locking mechanisms serviced, cleaned and lubricated on a yearly basis.